Showing posts with label Short and Sweet. Show all posts

Sunday, January 6, 2013

Colourful Mashup


I am enjoying my final couple of days of holidays before heading back to work tomorrow and while I haven't been as busy at the craft desk as I was hoping I have achieved a lot around the house and did get chance to join in with the Colour Q and Friday Mashup Challenges.

Colour Q this week was to pick one of the 2012 colour combos that a member of the Design Team had chosen, there are some lovely ones to choose from but the one Yapha used with Rich Razzleberry, Night of Navy, Bashful Blue, Crumb Cake and White. I love how these colours look together, and I had fun deciding how I would use them on the sketch and incorporate some hearts.  You can see the new Sale-A-Bration Pretty Petites set used again here for the outline on the vertical banner, the hearts in the centre were stamped using the little heart from the Create a Cupcake set stamped and then stamped off for alternate hearts. 

I think this card takes the lead in most number of stamp sets and tools used, see if you can spot them all ...

  • Bitty Banners Framelits - on the sentiment
  • Fashionable Hearts Embosslits - for the two hearts
  • Scalloped Heart of Hearts Embosslit - I ran the two hearts through this embosslit to get the embossed hearts on them
  • 1" Square Punch - for the end of the vertical banner
  • Stamp-A-Ma-Jig - for lining up the frames and hearts
  • Pearls
  • Elegant Butterfly Punch
  • Papillon Potpourri
  • Creative Elements
  • Short and Sweet
  • Pretty Petites
  • Create a Cupcake
I also used my Paper Trimmer, Snips, SNAIL and Bone Folder, and I think for such a simple layout that isn't bad! I was about to hit the publish button and realised I didn't mention my embossing powder and heat tool!!!


Happy Stamping

Friday, December 28, 2012

Chocolate Holders

This is the first of a number of posts to catch you all up on what I have been up to in the weeks and days before Christmas.  The first was inspired by wanting to give my work colleagues something in the lead up to Christmas.  I had seen a number of cute Ferrero Rocher chocolate holders but it was the ones that Tanya Bell created that had me captivated. 

I made a total of 20 of these little cuties, they were reasonably easy to mass produce and Tanya's tutorial is well worth getting if you like these - just go to her blog and click on the Tutorials tab at the top of the page.  Tanya is so very talented and done some lovely work.

Here is a close up of one of the 'boxes', I think they would look so cute with a couple of holes punched in the top of the dome with some pretty cord threaded through and then hung on the Christmas tree.  I made all of these using the current Christmas DSP - Be Of Good Cheer, I love this particular pattern for this project.

Pop back over then next few days as I will have more posts of my pre-Christmas projects, as well as a couple of new ones made with some of the Sale-A-Bration products that you can earn from 22nd January 2013.

Happy Stamping
Saturday, February 18, 2012

Simple Christmas

 I might have missed January but I am on track with my Christmas cards for February having joined the Merry Monday Challenge for the second week.

My creation is fairly simple, but given a bit of a lift with a silver Glimmer Paper enhanced star on the top of the tree.  The tree is from Seasons of Joy and the sentiment from Short & Sweet, the DSP is from this year's Letters to Santa collection.

Only a short post for me today, I have a few more projects I have done that need photographing and uploading, so pop back over the next few days.

Happy Stamping

Thursday, November 24, 2011

Time to Give Thanks

Happy Thanksgiving to all my American visitors.  We don't celebrate Thanksgiving in Australia, but I think it is nice to have a day where you take time out to focus on things that you are thankful for.  Before I get onto this weeks challenge I thought I would share a few of the things I am thankful for at the moment ... I am so very thankful for my family, my wonderful husband of 20years and beautiful daughter; I am thankful that I am in a job and field that I love and makes a difference in people's lives; and I am thankful that I have stability and a degree of security in my life that fewer people have these days.

Now onto this week's inspirational picture, you can use this picture in any way to inspire your creation. You can use the colours, theme, layout, or just part of the picture like the clouds or the rays.  I look forward to seeing your entry so pop over to Paper Lovin' Gals and see what the other Design Team members have come up with and add your entry.


I chose to use the layout and colours, and kept "Thanks" as the sentiment.  I sponged over punched out scallop circles with So Saffron and More Mustard to make the clouds. I also used More Mustard on a sponge to lightly colour the Velvet Designer Ribbon from the upcoming Summer Mini Catalogue that goes live here in Australia on 1st December. I was happily surprised at how well it took the colour. The sentiment, from Short and Sweet is on a piece that has been doubly cut with the Decorative Label Punch. 

I stamped the sentiment and then punched once, ensuring the sentiment was toward the bottom of the punch. I stuck the punch out onto the back of a post it note to give me something to guide it into the punch with and lined it up and re-punched.  The picture shows how this lines up, and the little tabs on the sides are just perfect for pearls, bling or brads.  I just love finding extra uses for the tools I have, it makes them really versatile and great value.  

Happy Stamping

Saturday, November 19, 2011

Back to Mashing Things Up!

I went to look at which Friday Mash Up we were up to and was shocked to see it is challenge number 33 this week, wow how time flies!  Anyway, onto the challenge "Everything's Coming Up Rosettes!" ...

 This week we had to use the sketch, or use a rosette, or mash it up and use the sketch with a rosette.

As I often do I chose to mash it up and do both.  My rosette is made from the Cherry Cobbler Striped Grossgrain Ribbon, it lost some of it's ruffles when I adhered it to the card!  I used the Flower Fest stamp embossed in gold and cut them out using the 5-Petal Flower.  The DSP is from the Letters to Santa, blue isn't a traditional Christmas colour but I am really liking it, especially with the Early Espresso. 

I enjoyed playing along with the challenge again, pop over to the Friday Mash Up to check out what the Design Team and other entrants have come up with this week.

Happy Stamping

Sunday, September 11, 2011

Baby Card

My second sketch inspired card was inspired by my favourite challenge site Friday Mash Up but I only used the stitching part of the challenge as in Australia we are headed toward the end of the school year!  The colour came from Just Add Ink which was White and one other colour, and finally the sketch came from Utah Divas Saturday Sketch.
I made this card for a friend who has recently had a beautiful baby girl, and I knew when I got my hands on the new Stocking Punch that is going to be available for Australia and New Zealand customers from 1st October.  One of the benefits of being a demonstrator for Stampin' Up! is that you get sneak peeks, and pre-order for promotions, how good is that! While the traditional use for the punch is for Christmas, I have turned it into a pair of pretty pink booties. 

The idea for the Modern Label Punch came from Donna over at Butternut Sage Designs, isn't it cool! The mechanism of the punch is to cut from the outside so you just have to punch carefully and stop after it has cut only part of the shape.  Then slide a strip of ribbon under and there you have it, a cute little accent for your card. 

Happy Stamping

Saturday, June 18, 2011

Challenges Past & Present ...

I have actually missed the last two Friday Mashups!  Having been a Guest Designer for May I feel quite bad that I didn't get to put in an entry for the last two Mashups, especially since I had actually made a project for one of them!!!  Luckily I am back on track.  I thought I would still share with you the one I missed, and then the current one.   The one I missed was the Colourful Kids Challenge ...

I have to say I am cranky at myself for not getting this posted in time - it was a bit of a struggle for me to complete the project having found I don't have any "kid" stamps and these are just not my usual colours!  However I did get the project done in time but was waiting for some sunny weather to take a decent picture, and here in Canberra in winter that is not such an easy thing.  At least I can now take pics at night with my new natural light lamp!  Anyway onto my attempt ... not a card this time but rather a little decorated dvd box.  I hope we get these empty cases in our next Idea Book & Catalogue here in Australia, they are so great.

This is the outside of the case.  I used the Colour Collections Stack of dsp and made the binding with the Daffodil Delight.  The little owl was just too cute not to put on the front of this one.  The idea of the parachute was from a Secret Santa gift I received last year, and I think it just looks really adorable.  My daughter however took one look and said "why would an owl need a parachute? Owls have wings!"

 Inside the case I put a matching decorated notebook and two matching mini gel pens.  My plan for this was to give it to my sister to keep in her hand bag for those times when they are out shopping and my adorable little niece is being not so adorable!  I am thinking of doing up one for my own handbag to keep a notebook and pen handy and neat and tidy. 


The challenge this week was to
  1. Create a Summer Theme Project
  2. Create a project using Polka Dots
  3. Or Mash It Up and create a Summer Themed Project using Polka Dots

I decided, as usual to go for the Mashup.   I picked nice summery colours Melon Mambo and Peach Parfait and used the Eastern Blooms set to make the feature flowers and to make the matching background paper.  The sentiment is from the Short & Sweet stamp set, I love this little set, great little sentiments that go with so many projects, and fit inside the word window punch (not used here).  The polka dots are a bit of a stretch but if you look closely at the centre of each flower you will see that they are covered in polka dots! 

I am also entering this card in the Stamping 411 sketch challenge this week.

Pop over to both sites and see what others have done with these challenges, let them know what you think when you visit their blogs.  I love comments too so please let me know what you think of my creations.

Happy Stamping

Saturday, November 13, 2010

Double the Challenge - Double the Fun

Today I decided to do a double challenge card!  Yep two challenges in the one card, and yes feeling quite proud of myself.  I saw the Sketch Challenge over at Friday Mashup and really liked the look of the Designer Label and the Oval punch together and knew I wanted to try that out.  Then in my browsing I found the Colour Q colour challenge, not my usual colours but I do like the earthy tones and so I gathered my colours on the desk and then decided to do the two challenges together!


I used the level 1 Hostess set "Because I Care" for the main flower, and the "Short and Sweet" for the sentiment, which just seemed to fit with the big flower.  I love the way the Short and Sweet fit so well in the punches Stampin' Up! have on offer, makes life so much easier!!!  Because the colours are all fairly heavy I decided to limit the amount of each on the card,  the scallop trim border and corner punches worked beautifully for this and the touch of Always Artichoke for the leaves and sentiment.

I also used some of the Always Artichoke to colour the crochet ribbon, I love the look of this ribbon and on this card it just seemed to fit with the more natural tones.  I hope you have enjoyed my entries into these two challenges, please come back and visit again.

Tuesday, November 9, 2010

Dasher Christmas

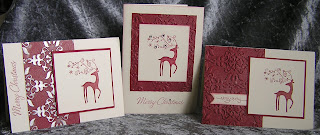
One of the tutorials on the We Stamp For Lara website was for Christmas cards using Dasher stamp, Embossing Folder and Shimmer Paint.  I completed the easy to follow instructions and these are the creations I made.  Dasher is such a great stamp, only $14.95 and so cute! Contact me if you are interested in purchasing this stamp.

 I will be making more of these, they are quick and easy to make.  I used Shimmer Paint as a mist on the Cherry Cobbler before putting through the Big Shot.  I added some bling with the self-adhesive rhinestones. Sentiments are from the Four the Holidays, and Short and Sweet stamp sets.

On this one I went over the raised embossing with a Sponge Dauber dipped in Shimmer Paint to bring out the pattern further.  I really really really love Shimmer Paint.