Saturday, May 7, 2016

ESAD Blog Hop - Time to Say Goodbye

Welcome to another ESAD Blog Hop.  Want to learn more about ESAD, check out the details at the end of my post. This is a mixed time of the year as we say goodbye with sadness to many of our much loved products from the Annual and Occasions Catalogues.  But the exiting thing is that we get a whole new catalogue shortly and all of the new wonderful products (and I can attest that there are sooooo many).  

This blog hop gives as the opportunity to showcase some of the retinging products one last time, and all I can advise, is that if you love them don't hesitate to order them as they will be gone by the end of the month.

On to my projects - I decided to make a set of four little 3" square cards using a range of retiring products.  I love little cards to add to a gift, or just to leave in a lunch box, or pop onto someone's desk at work. There are so many opportunities to make someone smile in their day. 

 The first card makes use of the Banner Punch and the Honeycomb Hello stamp set. I decorated the envelope with matching little banners.

My second card uses another of the sentiments from Honeycomb Hello and the balloons from Pretty Thankful. I added strips of Everyday Chic Designer Washi Tape, you could really change the feel of the card by using different Washi Tape.

 While I had my Pretty Thankful stamp set out I decided to use the images on my next two cards.  This first one has a combination of Blackberry Bliss and Lost Lagoon, two colours that I am really going to miss.

My final card, also using Pretty Thankful, uses the remaining retiring in-colours, Tangelo Twist, Mossy Meadow and Hello Honey.  I thought I would give you a tip on how to line the sentiments up in these shapes, a tip that would work on other shapes and stamps also.

Firstly stamp the frame and then lie the photo polymer sentiments exactly where you want them in the frame.  
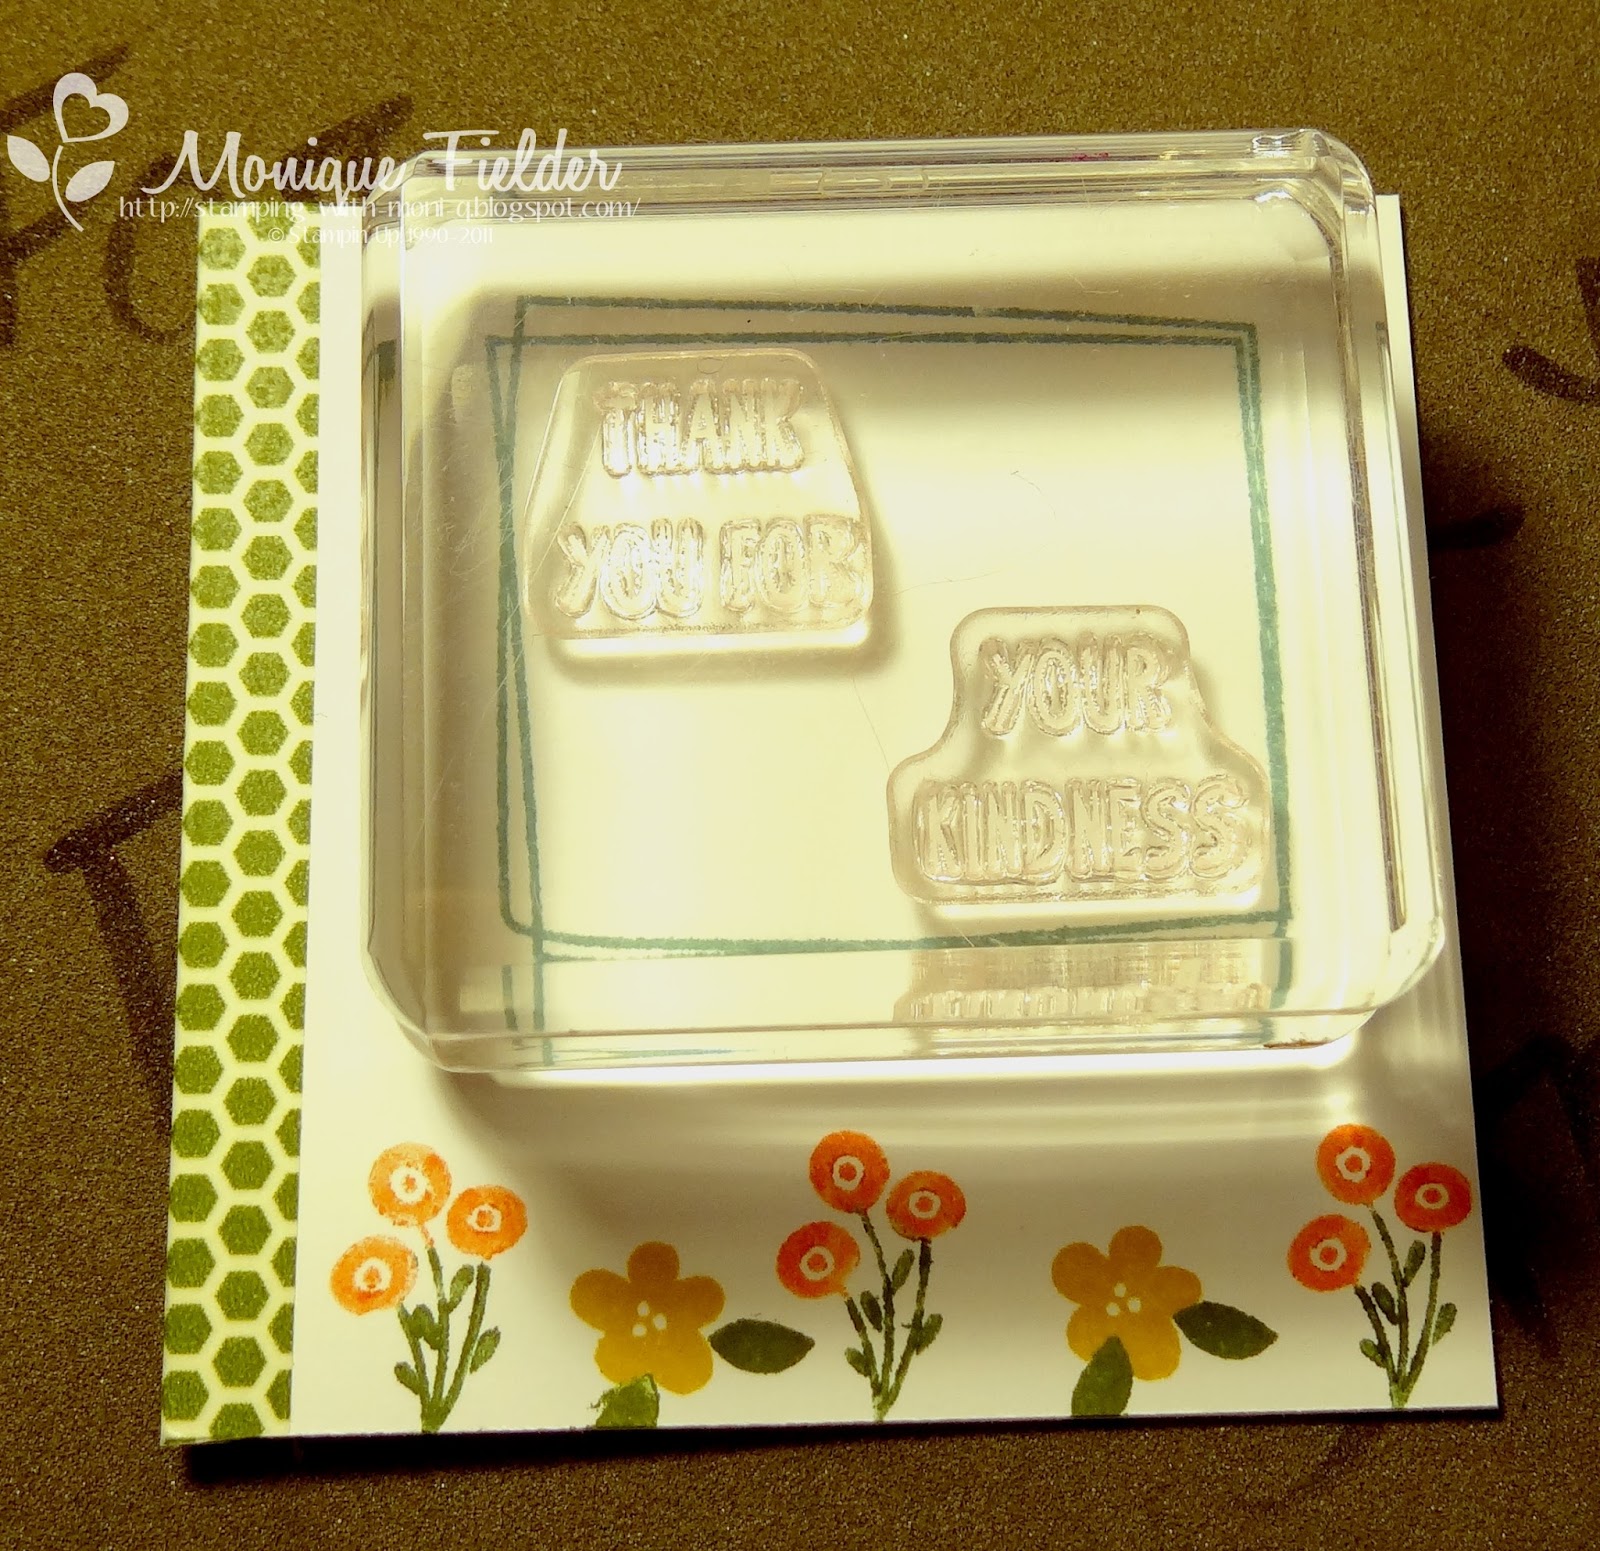
The next step is to lie a clear block over the stamps, the stamps are then perfectly lined up with each other and you only need to ink up once. It is pretty simple but has really been helpful to me when trying to line up multiple photo polymer stamps.

It is time to hop on over to Lou's blog and see what she has created.


Happy Stamping
Monique

Sunday, May 1, 2016

CTC #76 - Have a Cuppa

Welcome to another CASE-ing the Catty Blog Hop Challenge, if you are a new visitor each week we take inspiration from a section of one of the Stampin' Up! Catalogues and create a project. Sometimes inspiration comes from the stamp set, the colour combo, the layout ... anything really. Such a great way to really appreciate the work that the creative team at Stampin' Up! do.


This week we are taking inspiration from the Have a Cuppa section of the Occasions catalogue, pages 34 - 37.  I took inspiration from the pink card in the image above, you can find it on page 36.

I changed mine up a bit to use one of the retiring stamp sets Choose Happiness, and Cucumber Crush as the base colours.  I really like the monochromatic look of the card, but had to add some bling with both gold metalic thread and a few gold sequins. If you saw my post last week I used the same tip for adding the thread to the back of the punched out sentiment, I am loving how easy it makes things. I coloured part of the sentiment stamp using the coordinating Stampin' Write Marker to add some darker areas.

I used a technique we saw at the recent Stampin' Up! On Stage event to create the splatter effect. To do this squeeze an ink pad to get ink onto the inside of the lid then use an Aqua Painter to pick up the ink and "flick" it with your finger onto the page.  Sure it is a bit messy but is lots of fun and gives a great finish to the card.


I hope you are enjoying the hop, if we inspire you to join in please just add a link to the main blog page by clicking the image above.  

Time to hop on over to Helen's blog and see which project caught her eye.


Product List


Happy Stamping
Monique

Sunday, April 24, 2016

CTC #75 - Mother's Day

Welcome to another CASE-ing the Catty Challenge, this week we are looking at both the Annual and Occasions Catalogues to inspire the creation of a Mother's Day project.  I know Mother's Day falls at different times of the year across the globe, but here in Australia it is the second Sunday in May. 

I chose the card at the top right of the image above which comes from page 10 of the Occasions Catalogue.  I think the Number of Years gets thought of as a birthday set, but it is really quite versatile.

I struggle with totally white cards, I don't know why but I decided to add a little colour by adding Rich Razzleberry as the base of my card.  I chose some softer colours for the flowers also.  The sentiment from Crazy About You fits perfectly in the banner from the Number of Years set.  

I have a little confession to make, I really struggle with adding the twine behind a layer on a card, so I don't often do it.  My problem comes with the need for it to look random while at the same time being not very random at all.  Well, great news, while making this card I came up with a way to make this work for me and I thought I would share in case anyone else has that problem too.


Step 1 - Take the piece of card stock that you want to put the twine behind and lay it on your Paper Piercing Mat.  Measure the width of the card stock and 1/2" from each side put a pin into the mat.

Step 2 - Remove the card stock, and wrap the twine around the two pins leaving a little bit of a tail on each side.  Tie the pieces together with some spare twine, or with some washi tape, and remove the pins.

Step 3 - Line the twine bundle up where you want it and adhere with washi tape. I find washi tape allows me to pull the twine around a little and unlike sticky tape doesn't interfere with adhering the layer onto the card.  

This would work with any sort of twine or thread so you can expect to see a lot more of it on my project from now on.  This technique also works with any shape, and you can play around with how much twine you want to show really easily.

If mine, or any of the Design Team's projects, have inspired you to join in, link your creation to the main page. 

Now it is time to hop on over to Elizabeth's blog and check out her creation.


Product List


Happy Stamping
Monique