Monday, October 29, 2012

Christmas Ornaments

I had some fun on the weekend making some Christmas Ornaments with some of my new products and I thought I might just share them with you.

 This first one is a fairly simple ornament that I had seen somewhere on Pinterest, and in hindsight I would have used a couple more of the flower and snowflakes and spritzed the Real Red cardstock.  But all that aside, as a simple ornament I was happy with the outcome.  I found it easiest with the large outer image to adhere the two Framelits together to ensure an even cut each time.  I added some Rhinestones to the Bakers Twine to add some bling.

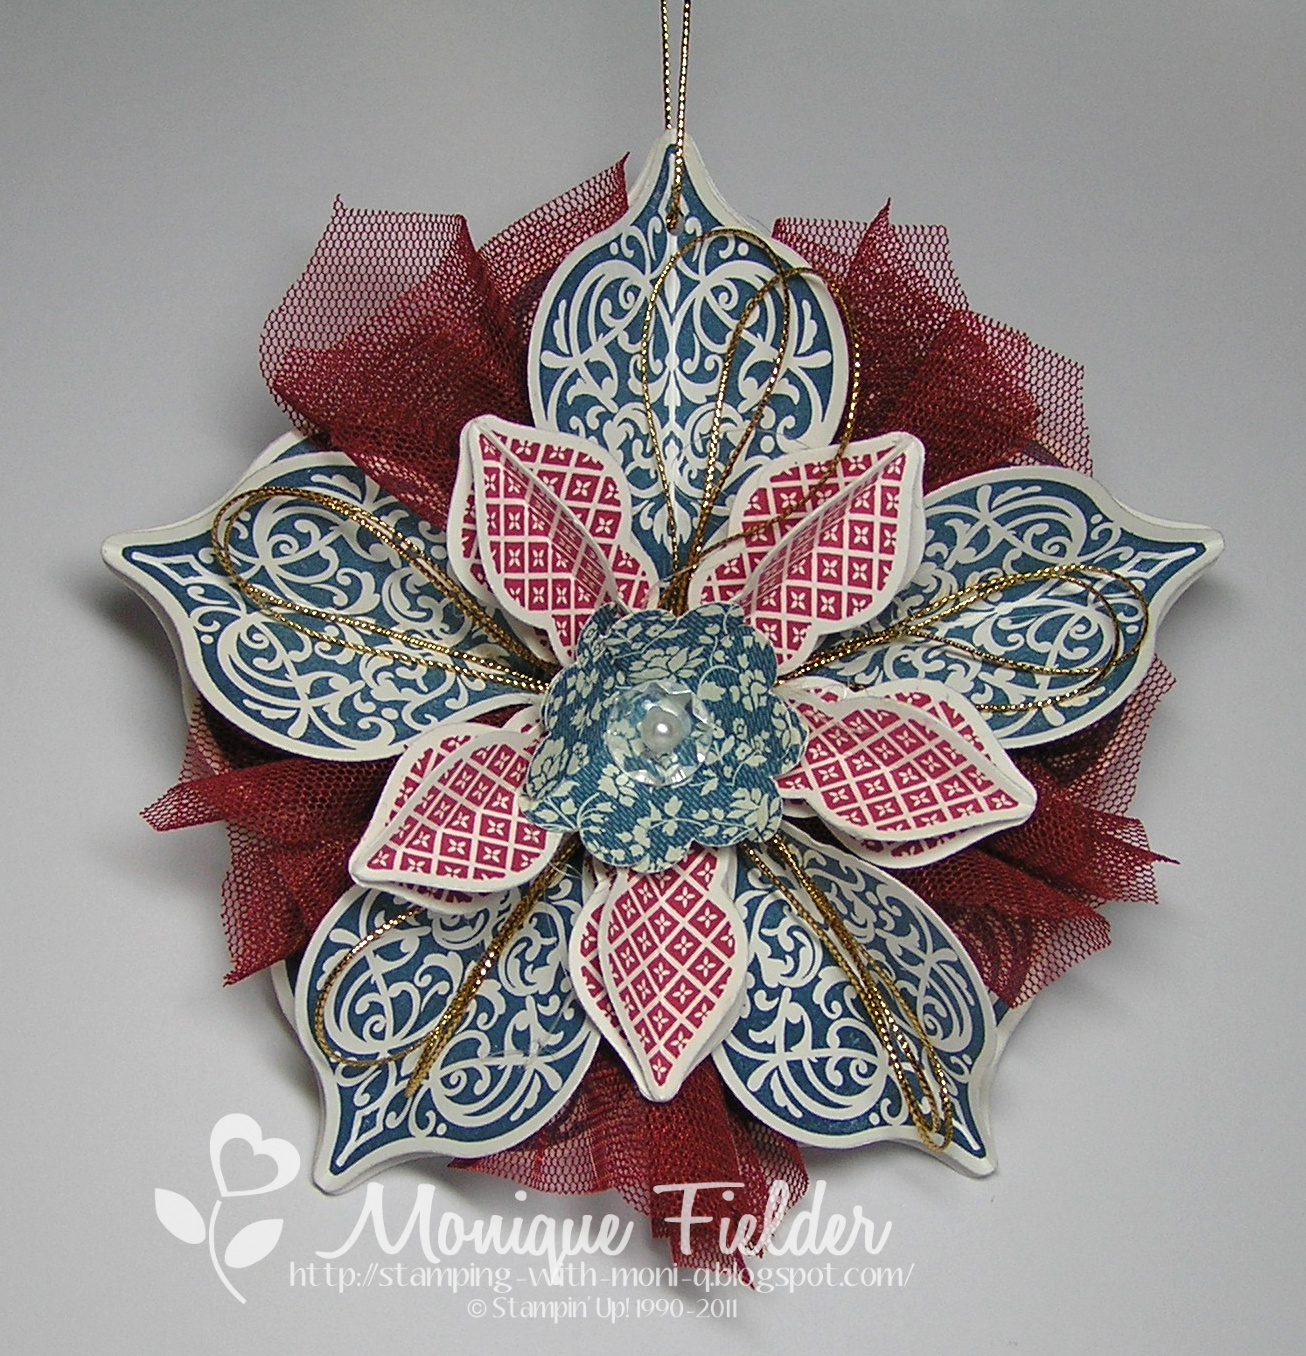
The second ornament is a variation of the one on the front cover of the Holiday Catalogue, I used Midnight Muse instead of Gumball Green and a scalloped circle as the centre rather than a rosette.  I snipped in toward the centre at every second scallop so that it would sit nicely, then finished off with a Faceted Vintage Button.  Each of the petals of the ornament is made with 4 stamped and cut out shapes, three of them are scored and folded in half and adhered together.  I used the video tutorial from Angie at Chic N Scratch - thanks Angie for putting the effort in, it made it much easier to follow along.

Here is my little tip for scoring all 30 ornaments.  Use one of the negatives and find the middle of the top and bottom and then adhere the negative over a groove on the Simply Scored tool - I have drawn in a line down the 6" mark so I used this score mark.  Just slip your ornaments into the negative and score down the middle - this is much quicker than lining each ornament up, or not scoring them before folding which doesn't give as clean a look.

Happy Stamping

Sunday, October 28, 2012

Just Playing

I was tidying off my desk and came across this lovely new Tulle Ribbon, available in the Holiday Catalogue.  I remembered reading a blog post about a technique where you heat the tulle with the heat tool until it starts to melt slightly and pucker up and I wanted to give it a go.  I have to say it works a treat, no need to gather it with thread, or on tape, just use heat (gently) down the centre of the tulle until it is puckered just how you want it.

With the fun of melting my tulle out behind me I decided to make a simple, vintage Christmas card.  The line of melted tulle needs to be covered up and I chose to use Crochet Trim to go along with the vintage feel.  Then the addition of what is my favourite ornament out of the Ornament Keepsakes set with a couple of strips of Champaign Glimmer Paper and a pearl and I was almost done.  The sentiment is from Greetings of the Season and is stamped with Early Espresso.

I will add the link to the blog where I got the idea from when I can find it again, as the author deserves the credit for this one and has done a lovely step by step tutorial.

Happy Stamping

Saturday, October 27, 2012

Festive Friday #42

Hi again, time for another Festive Friday challenge, and this week it is a colour challenge.  I have to be honest and was a bit scared by this mix of colours, especially for a Christmas card!  But isn't that what challenges are all about - the challenge?  If you are struggling a little for inspiration on this one pop over to Nicole's Festive Friday post and see what the other Design Team members have come up with.

This is my little creation for the challenge.  I decided to use Gumball Green DSP as the base for my criss-cross card, then add the Summer Starfruit and Elegant Eggplant in smaller amounts.  Ideally I would have loved this ribbon in Elegant Eggplant, but settled for the Summer Starfruit.  I just love these new In-Colour Ribbons, they are so soft and easy to tie into a bow.

Now just a peek at how this card opens so you can see the full effect of the criss-cross design.  Having the sentiment slid into the doily helps hold the card together when it is closed.  A little trick in punching a circle out of the centre of the doily ... first punch the circle out of a post-it note, then adhere the sticky circle exactly on the doily where you want it.  Then line that circle up with the opening in your punch and you will have the circle exactly where you want it each and every time!  This works with any punch out shape and has saved me a lot of frustration!

Hopefully that has inspired you to embrace the challenge and join in this week, there aren't many more weeks to go to get your Christmas cards made!

Happy Stamping

Saturday, October 13, 2012

Festive Friday #40

Oops, there was an issue with the uploading of this post for this week's Festive Friday Challenge, so I have made a couple of tweaks including this great graphic which might give you a clue to the theme for this week's Product Challenge ...
Yes, it is to Use Buttons.  Big buttons, small buttons, plastic, glass or wood buttons the choice is yours - use one or use many. The great thing about the challenge this week is that you can use them any way you want, check out the design team for some extra inspiration if you need it.

I have used buttons in two ways today, one for the body of this cute little snowman from Button Buddies (the title of that set certainly called to me for this challenge).  I also used a couple of Old Olive flower buttons on the sentiment label.  Do you recognise the label?  It is one from the Apothecary Accents Framelits but I have trimmed it down to remove some of the detail on the top and bottom to simplify it just a little.

Now it's your turn, get Festive with buttons and add your card to the linkie at Festive Friday.

Happy Stamping