Tuesday, November 28, 2017

Christmas Decorations

I have been off work for the last few days with a sinus infection and asthma, so not much energy for doing strenuous things.  While it was worse I didn't even feel like crafting, just lots of time in bed flicking through Facebook and Pinterest.  Well good news is I am improving and my creativity has come back in small windows, so I had the chance to make a couple of the projects I pinned.

The first is this lovely wreath which is quite large and a little fiddly, but only until you get the hang of the cones.  I followed the instructions from Amanda at Scrimping Mommy. Her video is very clear and easy to follow, and I just love her accent and giggle!  I totally love how this turned out and it really is quite sturdy despite it only being done with the thinner specialty DSP.  I probably would be a bit more careful about placement of the cones so that I had an even number on the inside ring but think I "hid" the double black together by making it a feature at the bottom!  

My next project was these cute little ornaments, they are simply stunning and look really complicated but in truth are quite simple.  I followed this video from Carrie Rhodes, and used the Merry Music Specialty DSP which was easy to work with and just stunning as a final project.  I finished mine off with some rhinestones, silvery doily on which I mounted a basic black circle and snowflake cut with silver glimmer paper. 

I wanted it to be all symmetrical so planned the layout of my strips with each "side" using 4 dark strips for the main cross pieces and 4 of the lighter pieces.  Be mindful of which you want to show up on the finished star. I found that my second side I folded in the opposite direction (once you watch the video it will make more sense) as you turn it over on the finished ornament, so it was necessary to do this to ensure all the cross bars the same looking from the front.  Just have a play around and see how you go.

I had a little bit of time after dinner and it occurred to me that a "wooden" ornament could be lovely too. So I grabbed a piece of my Wood Textures DSP Stack and got to work. I chose one of the mid-tone shades, and again was careful about how I layered out the pieces so that most of the dark shades were at the front.  When thinking about how to finish off this one I decided ot play around with the Foil Snowflakes, flipping one over and using the Ivory Blends pen all over and highlighting parts of the ornament with the Bronze Blends pen.  I was so pleased with this look, in real life it really does give it a laser wood cut look.  I added some Pearls coloured with the Bronze Blends pen to the tips of the ornament, and a larger one (now retired) in the centre.  The Jute Twine from the Holiday Catalogue finishes off this more rustic look.  

Happy Stamping
Monique

Sunday, November 26, 2017

CTC #156 - Give It A Christmas Twist

Welcome to another week at CASEing the Catty Sunday Blog Hop, this week we are taking inspiration from any project in either the Annual or Holiday Catalogues and putting a Christmas twist on it!  I am so excited to see what everyone creates this week.

After flicking through the catalogue, and getting a bit distracted, I settled on the card in the above image from the Eastern Palace Suite on page 18 of the Annual Catalogue, although I think there are many projects in this suite that would lend themselves to Christmas, especially with that amazing framelit set.

Using the layout as my inspiration I added a panel of DSP onto the base card, stamping on it with the cute little flower from Carols of Christmas. The main sentiment from Merry Little Labels was cut using a stitched framelit circle.  I sponged a thin strip of the black and white check DSP with Real Red to add some extra depth and colour.  Mini sequin trim and Metalic Enamel Shapes finished the card off with a bit of festive bling.

I hope you are inspired to join us this week, a great opportunity to make another Christmas card to send out to friends or family. Just take your inspiration from any of the projects in the current catalogues and put a festive twist on it, then add a photo of it to the CTC Facebook Page.

Time to hop on over and see what the lovely Judy has created this week.

Happy Stamping
Monique

ESAD Blog Hop - Blends

Welcome to another ESAD Blog Hop, this time we are going to be showing you projects made with the wonderful Stampin' Blends.  It is so exciting to have these alcohol markers that coordinate with the rest of the Stampin' Up! colour range.

I couldn't help but use my new stamp set Bird Banter, I love these little birds and they are nice and little and cute for colouring.  I am not sure that you would actually find this colour combo in nature but I think he looks cute!  I used quite a few colours on him, building up and overlapping colours as I went. I also used my Stampin' Blends to colour three Rhinstones for a little bit of bling. I think this sentiment from the bird banter set is going to be my most used (I am always late with birthdays!!!).

Inspired by branch he is sitting on I created an Old Olive panel using my new Layered Leaves 3D embossing folder which I have only just received. I did wonder how much "better" the 3D leaves would look than regular embossing, but let me just say they are amazing, to have different depths of embossing on individual leaves is just brilliant.  Deciding to pick up the lovely Pumpkin Pie on his head and beak I added a little border on one side using the Decorative Ribbon Border and mounting it all on a Pumpkin Pie base.

If you are interested I achieved these looks with the following colours:
His face and wings are done with a base colour of Light Pool Party with Light Daffodil Delight blended over the top to give the blue/green shade then highlights were added with Dark Daffodil Delight. His head and body were Light Pumpkin Pie shaded down into Light Daffodil Delight.  Beak Dark Pumpkin Pie and his collar Light Cherry Cobbler. Tail a combo of Light Cherry Cobbler and Dark Pumpkin Pie.


Time to hop on over and see what Amity has created with her blends.

Just in case you get lost on your way around, here is a list of all the blog participants:
9. Monique Fielder - You Are Here


Happy Stamping
Monique

Wednesday, November 22, 2017

CI #22 & #23

Welcome to a bit of a special challenge this time around with Colour INKspiration, because of the way the calendar lies this challenge will be open for three weeks and to give you some extra inspiration we are offering two images and associated colour schemes.  So join in with one or other of the colour schemes below, or go all out and create two projects each using a different colour scheme!

I like these two colour schemes, one is more suited to our summery Christmases in the South Pacific and the other with the wood fire and reindeer is more reminiscent of Christmas in a colder climate. 
CI #22 colours are

  • Marina Mist
  • Sahara Sand
  • Whisper White
  • Pear Pizzaz
  • Soft Suede
CI #23 colours are 
  • Crumb Cake
  • Real Red
  • Basic Black
  • Whisper White
  • Silver Foil

As you can see I chose the bolder of the two colour combos to make a cute little treat bag.  This was inspired by one I received as a swap at On Stage recently.  I made this one using the small bag on the gift board punch bag, folding over the top 1" of the DSP and sponging in Real Red to create the contrast.   The tag, from Merry Little Labels, is stamped in black on water colour paper before adding a squiggle of Real Red with my Aqua Painter. I decided it needed something "else" so added the three little deer, inspired from the colour combo picture, and a black border to the label.  The label is raised on Dimensionals to make it stand out just a little more.  I was going to add one of the Season of Glitz Mini Gift Bows, but decided that would have been a bit too much!


I hope you join in with one or both of the colour combos for this challenge, just make a project with either and add it to the CI Facebook page.

Time to hop on over and see what Denita has created this week.

Happy Stamping
Monique

Tuesday, November 14, 2017

Magical Sneak Peek

One of the benefits of being a Stampin' Up! demonstrator is that I have the opportunity to meet up with other demonstrators and we are the first to see products from the new catalogues. I attended one of these events on Saturday in the Gold Coast and not only did we see some of the new products, we also brought some home with us!

One set that I have been itching to share is the Magical Day stamp set, it is so cute and has images of a dragon, unicorn, mermaid, knight and wizard; as well as 5 little stamps to coordinate with the main images and two sentiments! I only arrived home last night and first thing I did after unpacking (I was being very good) was to make a couple of cards with this new stamp set.  

People who know me well know that I love unicorns, so this little beauty had to be the first image I inked up.  I coloured her with the new Stampin' Blends using both shades of pink and the dark Pool Party, as well as the colour lifter around the dots on it's rump.  This seemed perfect to team up with the Bundle of Love Specialty DSP.  The sentiment I have actually cut into two parts, with the banner sitting above the unicorn more traditionally sitting over the "one of a kind".  This set has a coordinating set of framelits that cuts a cute curved banner for the sentiments on both cards and I can't wait to order that!

My second card had to use the dragon image, as my hubby is as mad for dragons as I am for unicorns (this really was the perfect set for us!).  I am not 100% happy with the background card stock, but like the Christmas DSP on the middle layer.  I added an embossed panel of trees to give him something to hide in!  I again used Stampin' Blends to colour him, using both shades of Cherry Cobbler and Calypso Coral as well as the colour lifter on his scales.  

I can't wait to make some more cards with this stamp set, even more excited to be able to make them with the coordinating Framelits and Specialty DSP which has glitter on it! I have to wait until December to order that though, so being patient.  

The Occasions catalogue goes live for customer purchases from 3 January 2018, so keep a look out for lots of sneak peeks on demo pages in the next month or so and start making your wish lists :)

Happy Stamping
Monique

Wednesday, November 8, 2017

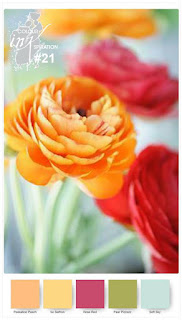
CI #21 - Rainbow Birthday

Welcome to another Colour INKspiration challenge, and what a bright and fun colour combo we have for you this week.

Aren't those flowers beautiful?  The colours we have chosen from this image are:
  • Peekaboo Peach
  • So Saffron
  • Rose Red
  • Pear Pizzaz
  • Soft Sky


When it comes to create for these challenges I often lay out pieces of cardstock in the challenge colours, and shuffle them around to help inspire me.  This week as I was doing this I realised that they were almost a full rainbow!  From that discovery I decided to use one of the stamps from Work of Art to make a rainbow background, for each colour I stamped in full strength, then stamped off twice to get three shades of each one.  

Once that was done I thought they looked a bit like streamers and so the addition of matching balloons seemed like the perfect accompaniment. Balloons on their own were a bit plain so I added gold embossing using Happy Birthday Gorgeous.  While I had that stamp set out I used the Happy stamped onto the banner, then added a gold Birthday using Happy Birthday Thinlits cutting off the Happy.

I hope you are inspired to join in the challenge this week, just use the challenge colours to create your project and add a picture to the CI Facebook Page.

Time to hop on over and see what the lovely Rachel has created this week.

Happy Stamping
Monique

Sunday, November 5, 2017

CTC #153 - Christmas Tags

Welcome to another week at CASEing the Catty Sunday Blog Hop, a challenge hop in which we take inspiration from one of the projects in the Stampin' Up! catalogues in our creations.

This week we are looking at the tags in the Holiday Catalogue, there are so many tags in the catalogue, or you could take inspiration from a card to make a tag!  

I chose the tag on the jar of lollies found on page 52 of the catalogue. Once I got started I realised it was a similar layout to the card I made a couple of weeks ago!

I didn't want to make a Halloween tag, so changed things up just a little to give it a Christmas theme. I often give wine as a gift and love having a handmade take to make them a bit more special.  The sentiment is of course from Merry Little Labels stamp set, cut with the banner from the Mini Treat Bag framelits - it is easy to forget all the great shapes in this set, not just the mini treat bag.

I made the rosette from Merry Music Specialty DSP, however to make it pop a bit more I spritzed it with a mix of Cherry Cobbler ink and rubbing alcohol.  I coloured the Rhinestone embellishments with my new Cherry Cobbler Blends pen, just perfect for this sort of thing.  The "ribbon" is a combination of  Silver and Red Mini Tinsel Trim and Black Baker's Twine, holding them all in place with a little white bow.

The great thing about these sorts of tags is that they work equally well for other bottled gifts, and all occasions.  

   
I hope you are inspired to join us this week, with so many tags to use as inspiration your Christmas gifts will look so special. Just take inspiration from one of the tags in the Holiday Catalogue and upload a picture of your project to the CTC Facebook Page

Time to hop on over and see what the lovely and talented Rebecca has created this week.

Happy Stamping
Monique